Tuesday, 8 October 2013

Card For A New Home

Good afternoon crafters,  J yippee!!  We have rainy day here. Even though I am not posting much so lately, i want to assure  you  that i am pretty busy with things  going on and I have just started  taking  lessons in two different  things  i never done before . For the time being i am not going to tell you what i am doing J but in the near future will keep you updated and share  my stuff with  you.

Today’s project is this simple card for a couple that are moving into a new home. You don’t really need a lot of  expertise, just some imagination, creativity, papers and embellishments.

So while I go and get some more work done, wish you a blissful day and maybe later in the day will update something else ;)


 It takes hands to build a house, 
but only hearts can build a home.  
~Author Unknown


Tuesday, 1 October 2013

An Altered Box

Good morning my dear friends, September is gone and a new month is with us as well.. October is one of the months I love, many people start crafting for autumnal ideas and also gearing up in preparations for Halloween, while it would be 3 months to go for Christmas.
Today am going to post an altered chocolate box....

As you may notice I love chocolate J  actually I am a chocaholic!! I love that dark Belgian choc, am lucky enough to have friends to think of me, and make me a jolly person.  Chocolate, music and a furry friend are my greatest companions while crafting.  Well, what more can I ask for!


 The story behind this altered box goes …  one  of my friends  got me this box of chocolates, which I truly appreciated the loving thought,  but as soon as I saw the  box,  J  thought it would  be great to be saved and  used  for an altered  project.

So I started working on, and the result is this beautifully box opening like a book which is going to be used as a tags holder ... for a wedding wish tree!


Hugs Carmen 
xxx

Saturday, 14 September 2013

A Mini CD Scrapbook

As you have seen in my previous post, I promised to keep you updated about the mini scrapbook I done recently with CD`s.
So here it is all for you. I named it “Inspired” as I was inspired by the many beautiful  scrapbooks I have seen around and wanted to add something in about one of my passionate hobbies...  which is Sewing.


For the front cover used bits and bobs I had in my craft stuff. The sequin flower was given to me by a neighbor and in past it was embellishing a bag... A simple flower done by me in tulle was added and the other stuff are remnants from other projects.


On the second page layered on some free printables I found from a blog by Gina`s Designs On the main card sewn on some mother of pearl buttons and the other wrapped around some seam binding ribbon. The mini tile is made from polymer clay by myself and fixed on a little saying from Prima papers - Life Time Collection. At the end sanded the edges and distressed them in brown to give the look of a tile and finally applied on Ranger- Glossy Accents.


For the background of this page used papers from Tim Holtz - Idea-ology Collection made a vertical pocket with some tags in the pocket and also between the pages. At the edge of pocket glued some lace and a bow along the pocket with a little paper flower. Each page I distressed it and inked the edge in dark brown.


On this page applied the rest of printables by Gina`s Designs and underneath inserted a tag and some tokens.


On this page used various stamps as the paper was just simple blank. In the middle of the page I glued on a quote about inspiration, to keep up with the subject of the scrapbook.  At the edge stamped on two swallows as if they are holding the last verse of the quote and at the bottom arranged some flowers.


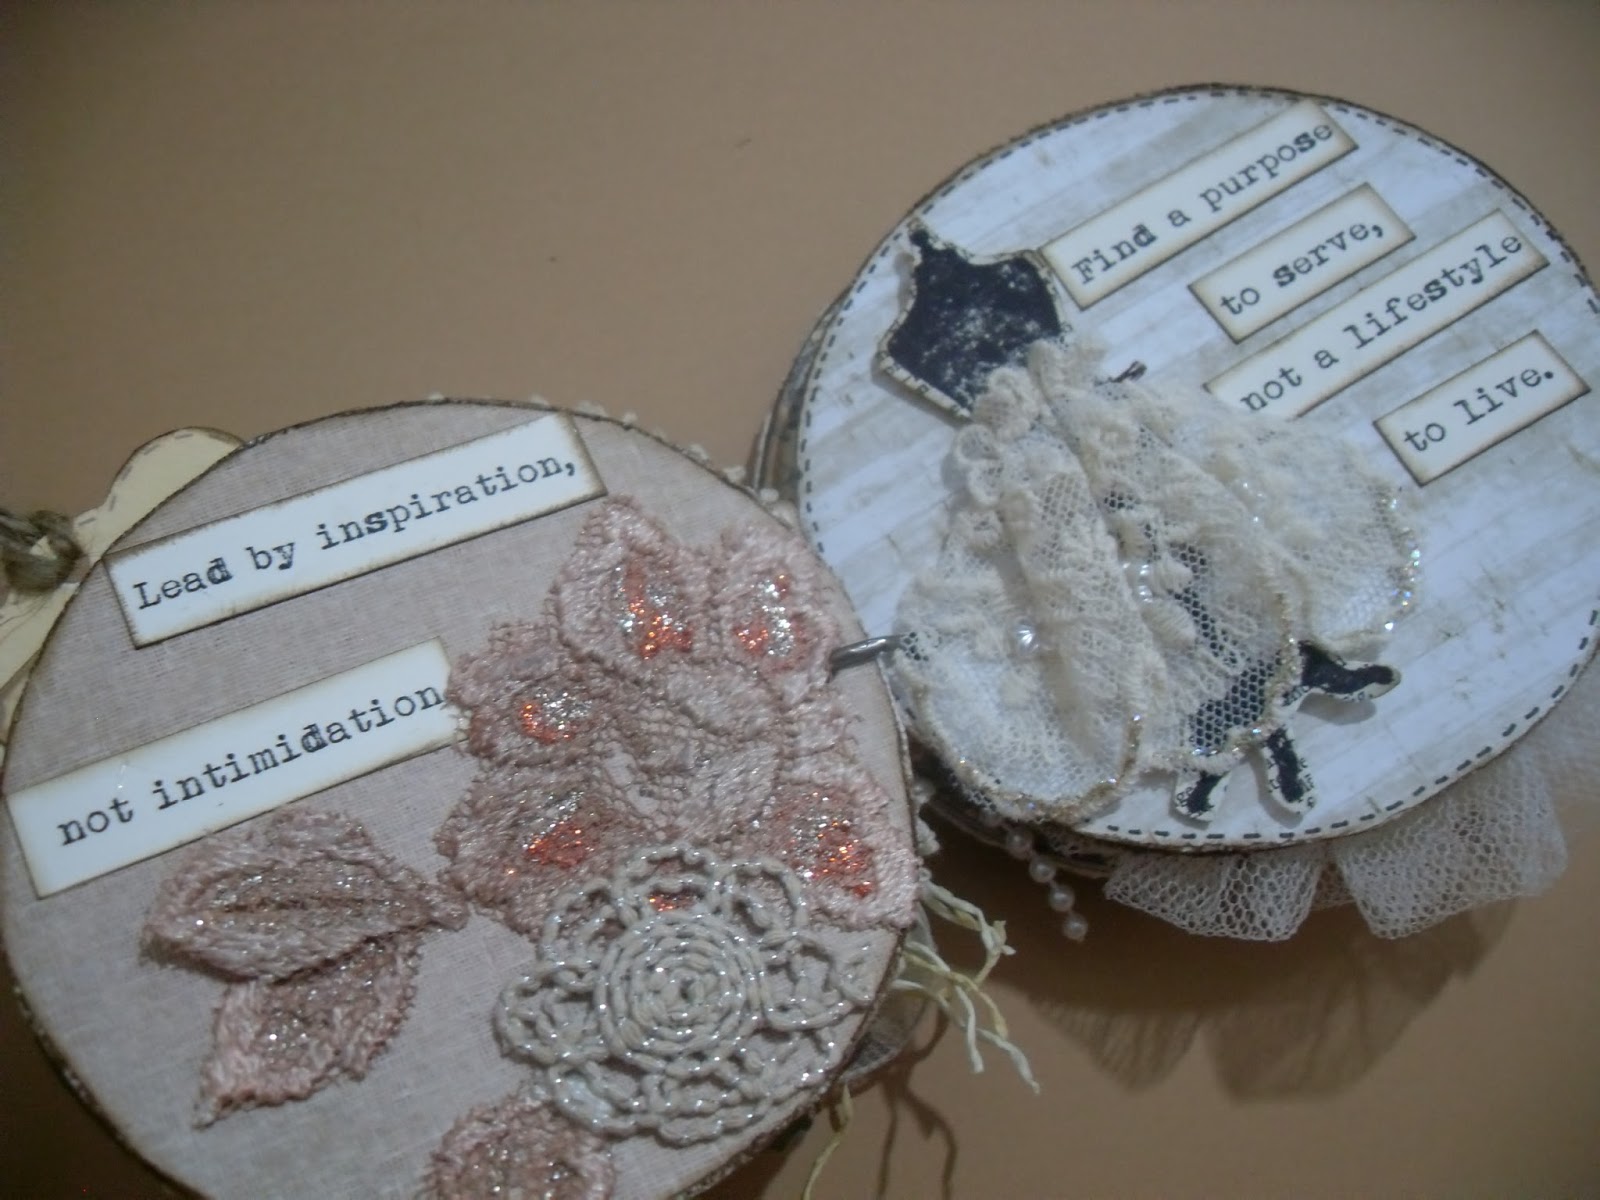
This page is simple with a quote and some lace appliques sprayed on with perfect pearls and Stickles glitters on.


Background paper is from Prima -Lyric Collection. The quote glued on the right side with stitching at the edges of the page. Left hand side a dress maker form stamped on a dictionary paper and cut along the edges, dressed on with a lace skirt.


This page I kept background simple plain as my intention was to dress up the corset which is something  I love doing  like the dress maker form. Stamped the corset and applied silver embossing powder. Folded two strips of tulle and gathered it, layered them on top of each other and glued them to the edge of the corset. For embellishments used pearls on a string and a crochet flower. Finally stamped the sentiment from The Sewing Room set by Visible Image.

I am entering this into Visible Image 'September Sentiment’ Challenge


The background paper is from and old dictionary which I printed and stamped on. Used a sentimental stamp by Visible Image and embellished it with paper flowers.


For the back cover used plain paper and embossed it with   the French Script folder from Tim Holtz- Eiffel Tower & French Script Set. Highlighted the embossing with distress ink and finally sprayed on some liquid 
pearls.


Wish you all a happy crafty weekend

Love Carmen
xxx


Tuesday, 10 September 2013

Altered CD

Recently I was wondering what shall I do with the amount of unwanted  CD`s we throw out in the trash . Recycling is always on my agenda, I had been already using them as coasters, but wanted to do something else with them. So I went on my quest, to find some more ideas to add to the ones that  I already  had in mind. So I went on to Pinterest. Over there I came across some cool projects,  that you would never imagine that underneath the papers and lace, and there is another story... I do already have an idea in mind to make use of the CD empty spindle  for some altered project; all I just need is plenty of free time to play about J

So I decided to make my first project simple and it was a wall hanger, decorated with papers and flowers and some stamping. The result was simply beautiful.


It doesn’t cost you much, with all the scraps of papers, laces and flowers you can make a this beautiful wall hanger or else as fridge magnets or else turn them into miniscrapbook like I did ;) OK I will soon post  the mini scarpbook that I done  recentley,  but untill then  you just have to wait.


I am entering this into Visible Image 'September Sentiment’ Challenge. The stamp used is Live Your Dreams which happens to be one of my favourite stamps J

Wednesday, 21 August 2013

Some Birthdays

Good Evening ! Weekend came and gone and another new week is on the roll ! For those who work on weekends and holidays like myself, weekends are just ordinary days. Some have to offer their services and we have to appreciate the work these people do, with  lack of time they spend away from their families. So here I am today having  on my desk, dedicating some time to my blog which I have neglected a bit lately.

This  post is about a womans and a male birthday. For the womans card I used some flowers which I learned how to make from some tutorials on You Tube. The background  is just plain paper with  stamping on, dusted with  perfect pearls  and also some liquid pearls. Then  laid a paper doily to give it that vintage look which after realized I should have dyed with coffee to give it an aged look.  At the bottom layered on some lace with some ribbon over and some pearl braid. Then finally layered of the design with the flowers.  


For this card all I just used was 4 different types of stamps and some bronze chain.


For the background used distress inks more than one colour to be exact but on the same shades. After distressing the background, sprayed water on to the paint to make the paper look like aged and then stamped on the calligraphy. 


Tuesday, 6 August 2013

Another Sewing card

Hello J oh my... how I had fallen  behind in my posts!!  It’s been a while since I posted something although I kept doing some jobs. We are in middle of summer and it is scorching temp of 35° and over, till the point that leaves you lethargic and at times out of breath... to be honest I feel that we are being roasted alive. Am not a summer person anymore, when I was younger used to hang out days by the beach. The more I grew up, I become conscious about being sun burnt and also with the high rates of skin cancers.  It’s not worth it for me anymore, for every day spent by the beach end up  applying creams days after and screaming ouch ouch ha-ha  J  So yes  the rest of my summer between my job is going to be at home feeling fresh, eating healthy salads, summer fruits, and plenty of refreshing showers. I am hoping to catch on some projects and not forgetting to spend special time with my family and friends.

One weekend I planned to meet an old school friend, while discussing where to eat out, her idea was to go to our sister island Gozo.So we ventured on to have a meal out at Gozo. Don't call us crazy ha-ha J  actually it turned out to be a very enjoying eve crossing the channel at night. When  it comes to food we were very satisfied, especially the restaurant situated next to the shore, feeling the fresh breeze coming up straight from our Mediterranean sea. I love this island, with  it's impeccable beauty especially in winter with all that greenery from the countryside. It’s not so dense like Malta; there are many places of interest from cultural to sightseeing and especially many diving spots. Good food by the sea is never an exception while  Gozo lace is abundant for those who love artisan work .

As this saying says “The best things in life are unexpected - because there were no expectations. - Eli Khamarov”

Soon I have to pull my socks up, as my youngest brother is getting married next May and many projects in the pipline wink ;)

So today’s card was for a person whom is a seamstress. It was her 60th  birthday and this was specially done for her.

Supplies List:
  • Dictionary paper
  • A4 card stock
  • Rubber stamps
  • Sizzix On the Edge Die - Sewing Edge
  • Flowers -I Am Roses
  • Thread
  • Buttons
  • Ribbon
  • Lace


The dress maker form dressed it up with a pleated skirt, with a bow at the waist and a crocheted flower at the bottom of the skirt. The skirt was pleated in a fan shape and inked a bit at the edges of the pleats with distress ink. If you notice  machine stiching  was used on the back ground. 


Wednesday, 3 July 2013

Mother Theresa Frame

Recently I done another frame with a quote from Mother Theresa and must say I am so very happy with the outcome.J

Knowing that one of my best buddies at work Melissa is going to missionary work in Ethiopia with the Living Waters, decided to make her something for fundraising. So I got her into choosing a quote as resectly she was reading her biography and  looking at her FB status you always find a good quote that make you reflect.

The work that this mission is doing is incredible, children having schools, people having a home with fresh clean water in the villages and mostly the word of God. All this is with the kind help of the Maltese people nation which is very generous and kind in every situation. I am so proud of her that she is leaving everything behind  for 5 weeks, to make a difference in these poor people lives.

Many times we complain for going to work or for finding something different to eat on our table than we expected ... while we complain and grumble about everyday simplest things, let us be grateful for all that we have...to have a roof on your head and money in your pocket to buy everyday simplest necessities is already a blessing. We are already lucky enough to have schools, so we can educate ourselves, let us not waste that positive energy. 

Have a great day dears xx.


Supplies List
  • A frame A4 size is perfect
  • Card for backing
  • Stamps 
  • Distress Ink Pads
  • Ink pads
  • Embellishments
  • Old Dictionary paper
  • Seam Binding Ribbon
  • Paper flowers by I am Roses
  • Washi tape
  • Faber Castell - pitt artist pen Manga black set


For the backing effect with lines no stamp was needed. Some time ago i saw a crafter somewhere on You Tube using an old credit card. Simple to do, dip one side on an ink pad and then stamp it on the card in the desired angle, and voilĂ  there you have an interesting background without spending money on stamp.


After cutting 6 layers of petals for the flower colour them with distress ink and marked close the edges with a fine tip. Finally done the stamping on the flower petals. To make the center of the flower used a clock stamp.


Let us always meet each other
with smile, for the smile is the
beginning of love.

Mother Theresa